Sunday, October 20, 2013

6) Motorcycle Parts Have Arrived

How will the new parts fit?

One of the major issues I have found in trying to go none standard, off the normal path, the road never taken is no one know what you want when you try to order parts. The internet is a great way to shop for any and all parts. You can find anything you just have to know what you want and what it was designed for.

You may recall my project is to take a touring bike (GL1500 Interstate) and turn it into a Cruiser similar to this;
With a standard fuel tank, (not the faeux tank on the Honda), a frame mounted fairing, (smaller than the Honda) and simpler overall than the Honda Goldwing 1500 which is a big motorcycle.

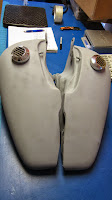
In the last Blog (#5) I discuss the disassemble and the removal of the fuel tank which was a challenge and the new Fatboy tank I ordered off Ebay. When the new tank arrived the challenge of making things fits began.

So I quickly took the new tank to see how it was going to fit. I knew there was going to be impact but I was hoping maybe minor tank modification or air box changes would be the extent. Well, no.

I was once told by one of my supervisor, "hope is not a strategy." This is so true. You can hope something will work but if you have not done the necessary research it comes out to be more of a guess. So I know I wanted a fatboy styled fuel tank and I kinda hoped (guessed) it would be OK. But I also knew I had to make a leap to see where and what I needed to do.  So now I could scope out how I can modify the air intake system and fold the Harley parts into my project.

My scoping started on the internet looking at aftermarket air intake systems. The system I tunneled in on was those put together by K&N air systems. I found one that I thought could have a chance of fitting into the frame. It looked good, small and simple, but I needed actual dimensions. I initially searched online specifications and found out the size of the shipping box, 12" x 12" x 20". Well not really the dimension I need.

Next I watched a few U-Tubes hoping for scale. So how big is a normal hand? That did not work either. So I decided to go right to the horse. I logged on to the K&N web page and sent them an E-mail asking for the physical dimension of their 57s-9500 air filter system and waited for the response. The response I got was they did not know!!

How can they not know! I continued to look at this air system and really liked it. So again I logged on the K&N web page and went to a Live Chat and again asked for the overall dimensions. And again the responses was they do not know. The only real information they have is what cars their systems will and will not work fit. I got a little frustrated and responded that it must be necessary to buy the unit for $135 to find out actually how big it is. At that point he guessed 7 1/2" wide and 8" long. Which would fit, so I order it, "hoping" he was close.

Well the 57s-9500 air filter will fit perfectly. Now I have a fuel tank and the air filter that will be the basis of the transition. I just needed to attach the air filter to the carburetor and make that fit under the fatboy fuel tank. 
This is a picture showing the space under the fuel tank and the top of the carburetors. You can see there is less than two inches of clearance and a very odd shaped carburetor flange.
So it was time to get creative. My first thought was to have a flange manufactured that would mate up with the carburetor and than piped to the air filter. This would be very elegant and is an option. But than I found a Honda Goldwing 1500 stock air filter box on Ebay for $4 and I had another idea. Can I modify the stock air filter box to fit under the tank and still tie it to the K&N air filter. And when the stock air filter arrived the cutting began and.......

Modifying a Honda Goldwing 1500
K&N Air Box in a Goldwing 1500
I was also able to build a aluminum box behind the K&N box where I want to move the coils and other relays.

Modifying a Honda Goldwing 1500
Honda Goldwing 1500 Cruiser project
 I have also been researching the electronics and instruments I am going to need, like the speedometer and fuel level indication. So what I have decided to do is buy a new fuel tank with a chrome dash, ignition switch, as well as fuel level sensor and other indicators/instruments. Once I have the new tank I will have it modified to sit lower on the bike for a sleeker look and also allow a clean fit underneath. Next step will be permanently mount air box, route plug wires to the new coil location, buy the right fuel tank and find a weld shop that can weld/modify a fuel tank.  For sure that is not me. 


Sunday, October 6, 2013

5) Bike Stripped and Waiting for New Life

Disassembly and Labeling Everything

I finally finished disassembly;
 
I took off everything I didn't want or felt I didn't need. Every time I took something off I would see if the bike would start. If it didn't I would re-install or reconnect. So all of the plastic had to go (the fairing and bags), there was a lot of plastic, as well as a very large gas tank. 

I spent a couple days just tracing and labeling all the wiring and vacuum hoses. Tons of plugs/connectors that all seem to have purpose. Again I would disconnect them one at a time and see if the bike would start.

Now the bike is covered with labels detailing each connectors purpose or what all the vacuum hoses were for. This is so after I strip everything off the bike, to clean it up, I hopefully will be able to reconnect them and the bike will run.
The gas tank removal was a nightmare. I followed the shop manual direction which required removing the rear tire, but the darn thing would not come out. First I had to remove the starter which gave me another half inch, but not enough. Then I needed to drop the swing arm so I removed the shocks, which only got me another quarter inch. The swing arm was now sitting on the exhaust system so I had to remove it.  If you have ever removed old, rusty, and seized studs and bolts you know they normally break. And yes I broke a few. But once the tank was out the amount of free space is amazing. I am thinking of building a box in this area for all the electronics.

The new replacement gas tank I bought off Ebay should be here next week. When I finally get it I will see how it sets on the bike and determine how the new gas tank will work (and that is being hopeful). At this point I will be able to start designing the new air box for the top of the carburetors. I will need to get creative because there will not be a lot of room.
The carbs extend above the frame and I am hoping below the two new gas tanks.


I have been looking at various aftermarket air filter systems but there will need to be a low profile adapter manufactured for the top of the carbs. So now I have a lot of planning, thinking and hoping to start bring this bike back to life. 

Wednesday, October 2, 2013

4) Motorcycle Build Prep and Disassembly

Cleanup, Prepare and Start!

Spent the afternoon and evening cleaning, organizing, and preparing to start the disassembly. The shop was a mess but with a little effort I made room.


So as I started dissassembly the shelves filled up quickly


The slow transition starts 


As I dig into the bike I am finding all kind of fun things like missing screw, broken tabs, and future challenges. This bike has a lot of mile on it and it shows in the condition. Mechanically it appears to be in decent shape but the fairings and bags were well used and not well kept.  I can hope someone on Ebay will be interested in all of the plastic.

As I start digging in there are a few things I think I will need. First I have been looking at motorcycle lifts. They range in price from $500 to $1000.  The cheapest one is at Harbor Freight which had fairly good reviews but the quality is a concern. There are some lifts for around $800 which use an air cylinder to actuate compared to the Harbor Freight lift which uses a hydraulic jack (muscle power). For what I am doing I think I will go look at the $500 lift. 

I have both a wire feed MIG welder and an old arc welder which should be capable of all of the fabrication I could need to perform. The other side of that is my ability to perform which I will need to practice. I have looked into a TIG welder which would allow welding aluminum and also would be fun to have.  

Looking into what I see initially as areas of concern there are a few real challenges. As I was removing plastic I note the number of vacuum hoses and the vacuum hose routing diagram on the gas tank. There are a lot of hoses that run all over. My challenge is to figure out which ones are really necessary.

There is also going to be a challenge with the a gas tank. The Goldwing Frame does not have a single center tube but two tubes that fork back very wide around the two carburetors. A tank from a Honda Valkyrie would possibly work but again if I wanted a Valkyrie I could just buy one. So I bought a old Harley tank on Ebay that I am hoping to be able to modify to fit. 


The other concern with the gas tank is the fuel pump. The bike might run on gravity feed from the tank but I think I will try to add a fuel pump to make sure there are no fuel flow concerns.

I should be able to finish removing the fairing and start determining what is required to keep as I start to determine the type of modifications. The next big thing is when I remove the Goldwing very large gas tank which is under the seat.  This should allow a lot of  space to help move thing around like the computer and all the relays. 
 So next is take more stuff off, look for other concerns, and start thinking about moving to the middle of the project which should be the really fun stuff and actually take the longest to complete.