Sunday, December 29, 2013

8) Waiting for the Tank Mods

Waiting waiting and waiting

I took the tank and the bike to the fabricators on November 14th and have been working with them periodically to insure we all are on the same page. The Fabricator, lets call him Billy, is doing a good job. He really want to make sure I get what I want. So he has been calling me before each step, we discuss it and than he makes the cut or welds the bracket. This is all fine, BUT I want my project back.

Here is a photo with the tank almost in position, the bottom has totally been cut out.

I was down just after Christmas and it appear to be ready to weld in the new bottom, with a level sensor I found on Ebay. So what have I been doing while waiting for the tank you might ask.

Well, spending money is the short answer.

I continually monitor Ebay for something I might need.  I have purchased the inner and outer fairings off of a 2010 FLTR Road Glide. Some scratches and broken tabs but it was a good price. I took it down to the fab shop to see how it was going to set.  It should look pretty good.

I bought a rear fender off of a 2009 FLH Electro-Glide and than found the taillight off a 03 and blinkers off a 2000. I finally found the headlights at a good price that will fit the fairing. Winter is the best time to buy used motorcycle part as riders clean up around their shops because it maybe to cold or wet to ride.

You may have noticed I am getting a mixture of years as well as model Harley parts to put into this project. The gas tank was for a 1995 FXDWG Dyna Wide Glide Harley, and the tank topped dash is for a 1995 FLST Heritage-Softail with the speedometer mounted in it. As I work through what this will look like I am picking and choosing what I like. Last week I bought the fairing wiring harness for a 1998 Road Glide and I started to try to figure out which plug is for what.
I think there is going to be some issues with trying to wire a 1998 Road Glide, a 1995 Heritage, and a 2009 Electro Glide to a 1994 Honda Goldwing.  Well I did say in the first Blog I was looking for challenge.

The bike should be back early next year. Which accurately is next week.  I am hoping for a great new year as I begin to assemble my project.  


Saturday, November 9, 2013

7) The Gas Tank Challenge

Everything depends on the tank

The size, position, and shape of the gas tank really can make the look of a bike. So it is vital you spend time thinking about it. So I have spent hours and hours stressing over what to do about the tank. First there is no standard tank I can buy that will fit on this bike.
I have cut the stock air filter box down and installed a customized K&N air filter to lower the overall profile. Than I needed to purchase a tank that was wide enough to fit over the frame.  The tank is a Wide Bob Stretch tank form a Harley Davidson. I did buy a Harley split tank off Ebay hoping it would work.  But when I looked into mounting the spit tank and finding a dash that would fit it got very complex.  So I went to the local Harley dealer and spent three hours going through catalogs to try to meet my needs.  I needed a tank that was a minimum 14 1/2 inches wide, maximum 19 inches long, 5 gallon capacity, fit a dash with mechanical speed-o and have an installed level sensor. Believe it or not this does not exist. So what will I have to compromise on was the question.  There were no 5 gallon tanks that could take a mechanical Speed-o. Late models that were the larger tanks all went electrical speed-o, and if you wanted a level sensor you need a late model as well. So I settled on a 4 gallon stretch tank which is 21 inches long and 16 inches wide and no fuel level sensor.
The 16 inch width gives me the frame clearance needed but the 21 inch length means I will need to modify the seat pan.  But with this tank I was able to buy the right dash and electronics to go with it. So now I need to make it fit the bike. Here are a couple photo shopped pictures looking at the tank profiles.

The left photo shows a level tanks and the right is tapered. Subtle changes can make a huge difference in the look of the bike.
So now I need to cut the belly out of the tank to fit the frame and lower it a minimum of 2 inches over the frame. This will get the tank to a starting position and allow me to see what else is necessary to find that optimum final tank position and look. I laid out the potential cut lines and took the tank to a local fab shop to see what they thought and to get an estimate.
 
It goes without say they have never done anything like this before. They were kinda excited but also hesitant. I left with the tank and I am waiting for their call. I hope they call soon and I hope the estimate is reasonable. Even though what I am asking for may not be.

Sunday, October 20, 2013

6) Motorcycle Parts Have Arrived

How will the new parts fit?

One of the major issues I have found in trying to go none standard, off the normal path, the road never taken is no one know what you want when you try to order parts. The internet is a great way to shop for any and all parts. You can find anything you just have to know what you want and what it was designed for.

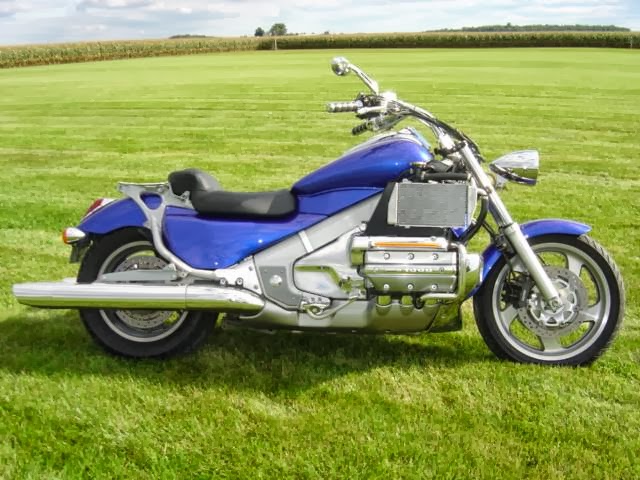
You may recall my project is to take a touring bike (GL1500 Interstate) and turn it into a Cruiser similar to this;
With a standard fuel tank, (not the faeux tank on the Honda), a frame mounted fairing, (smaller than the Honda) and simpler overall than the Honda Goldwing 1500 which is a big motorcycle.

In the last Blog (#5) I discuss the disassemble and the removal of the fuel tank which was a challenge and the new Fatboy tank I ordered off Ebay. When the new tank arrived the challenge of making things fits began.

So I quickly took the new tank to see how it was going to fit. I knew there was going to be impact but I was hoping maybe minor tank modification or air box changes would be the extent. Well, no.

I was once told by one of my supervisor, "hope is not a strategy." This is so true. You can hope something will work but if you have not done the necessary research it comes out to be more of a guess. So I know I wanted a fatboy styled fuel tank and I kinda hoped (guessed) it would be OK. But I also knew I had to make a leap to see where and what I needed to do.  So now I could scope out how I can modify the air intake system and fold the Harley parts into my project.

My scoping started on the internet looking at aftermarket air intake systems. The system I tunneled in on was those put together by K&N air systems. I found one that I thought could have a chance of fitting into the frame. It looked good, small and simple, but I needed actual dimensions. I initially searched online specifications and found out the size of the shipping box, 12" x 12" x 20". Well not really the dimension I need.

Next I watched a few U-Tubes hoping for scale. So how big is a normal hand? That did not work either. So I decided to go right to the horse. I logged on to the K&N web page and sent them an E-mail asking for the physical dimension of their 57s-9500 air filter system and waited for the response. The response I got was they did not know!!

How can they not know! I continued to look at this air system and really liked it. So again I logged on the K&N web page and went to a Live Chat and again asked for the overall dimensions. And again the responses was they do not know. The only real information they have is what cars their systems will and will not work fit. I got a little frustrated and responded that it must be necessary to buy the unit for $135 to find out actually how big it is. At that point he guessed 7 1/2" wide and 8" long. Which would fit, so I order it, "hoping" he was close.

Well the 57s-9500 air filter will fit perfectly. Now I have a fuel tank and the air filter that will be the basis of the transition. I just needed to attach the air filter to the carburetor and make that fit under the fatboy fuel tank. 
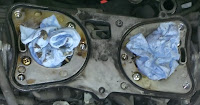
This is a picture showing the space under the fuel tank and the top of the carburetors. You can see there is less than two inches of clearance and a very odd shaped carburetor flange.
So it was time to get creative. My first thought was to have a flange manufactured that would mate up with the carburetor and than piped to the air filter. This would be very elegant and is an option. But than I found a Honda Goldwing 1500 stock air filter box on Ebay for $4 and I had another idea. Can I modify the stock air filter box to fit under the tank and still tie it to the K&N air filter. And when the stock air filter arrived the cutting began and.......

Modifying a Honda Goldwing 1500
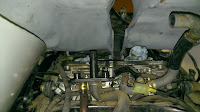
K&N Air Box in a Goldwing 1500
I was also able to build a aluminum box behind the K&N box where I want to move the coils and other relays.

Modifying a Honda Goldwing 1500
Honda Goldwing 1500 Cruiser project
 I have also been researching the electronics and instruments I am going to need, like the speedometer and fuel level indication. So what I have decided to do is buy a new fuel tank with a chrome dash, ignition switch, as well as fuel level sensor and other indicators/instruments. Once I have the new tank I will have it modified to sit lower on the bike for a sleeker look and also allow a clean fit underneath. Next step will be permanently mount air box, route plug wires to the new coil location, buy the right fuel tank and find a weld shop that can weld/modify a fuel tank.  For sure that is not me. 


Sunday, October 6, 2013

5) Bike Stripped and Waiting for New Life

Disassembly and Labeling Everything

I finally finished disassembly;
 
I took off everything I didn't want or felt I didn't need. Every time I took something off I would see if the bike would start. If it didn't I would re-install or reconnect. So all of the plastic had to go (the fairing and bags), there was a lot of plastic, as well as a very large gas tank. 

I spent a couple days just tracing and labeling all the wiring and vacuum hoses. Tons of plugs/connectors that all seem to have purpose. Again I would disconnect them one at a time and see if the bike would start.

Now the bike is covered with labels detailing each connectors purpose or what all the vacuum hoses were for. This is so after I strip everything off the bike, to clean it up, I hopefully will be able to reconnect them and the bike will run.
The gas tank removal was a nightmare. I followed the shop manual direction which required removing the rear tire, but the darn thing would not come out. First I had to remove the starter which gave me another half inch, but not enough. Then I needed to drop the swing arm so I removed the shocks, which only got me another quarter inch. The swing arm was now sitting on the exhaust system so I had to remove it.  If you have ever removed old, rusty, and seized studs and bolts you know they normally break. And yes I broke a few. But once the tank was out the amount of free space is amazing. I am thinking of building a box in this area for all the electronics.

The new replacement gas tank I bought off Ebay should be here next week. When I finally get it I will see how it sets on the bike and determine how the new gas tank will work (and that is being hopeful). At this point I will be able to start designing the new air box for the top of the carburetors. I will need to get creative because there will not be a lot of room.
The carbs extend above the frame and I am hoping below the two new gas tanks.


I have been looking at various aftermarket air filter systems but there will need to be a low profile adapter manufactured for the top of the carbs. So now I have a lot of planning, thinking and hoping to start bring this bike back to life. 

Wednesday, October 2, 2013

4) Motorcycle Build Prep and Disassembly

Cleanup, Prepare and Start!

Spent the afternoon and evening cleaning, organizing, and preparing to start the disassembly. The shop was a mess but with a little effort I made room.


So as I started dissassembly the shelves filled up quickly


The slow transition starts 


As I dig into the bike I am finding all kind of fun things like missing screw, broken tabs, and future challenges. This bike has a lot of mile on it and it shows in the condition. Mechanically it appears to be in decent shape but the fairings and bags were well used and not well kept.  I can hope someone on Ebay will be interested in all of the plastic.

As I start digging in there are a few things I think I will need. First I have been looking at motorcycle lifts. They range in price from $500 to $1000.  The cheapest one is at Harbor Freight which had fairly good reviews but the quality is a concern. There are some lifts for around $800 which use an air cylinder to actuate compared to the Harbor Freight lift which uses a hydraulic jack (muscle power). For what I am doing I think I will go look at the $500 lift. 

I have both a wire feed MIG welder and an old arc welder which should be capable of all of the fabrication I could need to perform. The other side of that is my ability to perform which I will need to practice. I have looked into a TIG welder which would allow welding aluminum and also would be fun to have.  

Looking into what I see initially as areas of concern there are a few real challenges. As I was removing plastic I note the number of vacuum hoses and the vacuum hose routing diagram on the gas tank. There are a lot of hoses that run all over. My challenge is to figure out which ones are really necessary.

There is also going to be a challenge with the a gas tank. The Goldwing Frame does not have a single center tube but two tubes that fork back very wide around the two carburetors. A tank from a Honda Valkyrie would possibly work but again if I wanted a Valkyrie I could just buy one. So I bought a old Harley tank on Ebay that I am hoping to be able to modify to fit. 


The other concern with the gas tank is the fuel pump. The bike might run on gravity feed from the tank but I think I will try to add a fuel pump to make sure there are no fuel flow concerns.

I should be able to finish removing the fairing and start determining what is required to keep as I start to determine the type of modifications. The next big thing is when I remove the Goldwing very large gas tank which is under the seat.  This should allow a lot of  space to help move thing around like the computer and all the relays. 
 So next is take more stuff off, look for other concerns, and start thinking about moving to the middle of the project which should be the really fun stuff and actually take the longest to complete.


Monday, September 30, 2013

3) Motorcycle Build Project Planning Begins

The Beginning Process includes Space, Tooling, and Concept Planning:

Let's talk about space;
Ok, where am I going to park this Large thing so I have the room to work on it for possibly a year or more and not have to move it because it is in the way of other small projects?
(Parked in the carport)

This needs to be one of the first decisions after of course buying it, getting home and telling your spouse it will be fine, "I know what I am doing (?)".  The plan is to strip it down to the engine and frame so everything that comes off may or may not be put back on. My intent is to only put back on what is needed to run and be the future bike I have envisioned. So with the expectation to sell everything I do not need, after I have determined what parts are not needed or parts of parts I will. So everything has to be stored somewhere. Somewhere dry and protected for possibly a log time. Well, my carport has room but is not well protected and my new shied is more weather tight than the carport but there is no lighting or shelving yet (And I am not sure I can wait). So that puts the build in my Shop.
(Just cleaned up the Shop)

This would be fine except I already have other things (toys) parked in there.

Can't store the Hot Rod outside!

Also there is the concern of all the past projects that I really never cleaned up from.The shop shelves will be the best place to store all of the Goldwing parts and pieces, (Once I clean them off), at least until I get the shied shelves and lighting installed. 

So lets see how everything is going to fit;
The shop door closes so this will work (?).

 In my next Blog I will discuss the new tools I want to buy, I mean that I need for this project.  Also start to discuss my concept and the problems/concerns that I can foresee turning a Goldwing into a cruiser.

Saturday, September 28, 2013

2) the Motorcycle Build Process:

The Key to a Project is the Process

A project needs to have a logical beginning, middle and a successful end. Not being done in that order does not mean a project will not succeed but there is a high potential for issues, concerns and problems that may result in errors, rework, lost time and added expenditures. This lesson was hard for me to learn especially after many project restarts. For this project I am going to follow the process.

Beginning;
I need to develop clear objectives on what I want and expect the motorcycle to do and as much as possibly look like. So what do I want? The final components and looks/function may vary (will vary) as a project develops. I have never own or even worked on a Honda Goldwing and I have only ridden a couple Harley Davidson, so I really right now don’t have a clue of what I am in for.


May be something like this.


With one of these.


And a couple of these.


I need a place to do the work with the room and storage necessary to keep removed components, pieces and part organized. My last project was a 1955 Chevy Pickup. I did a frame up stock restoration. The Pickup came out pretty good.


But a truck when taken apart took up a lot of space and the VERY large components like fenders, doors, bed, and the cab which cannot be moved around easily need to be put out of the way. Also every screw, bolt, bracket and plug, if you plan on reusing them needs to be stored so they can be found and separated by use. 

The motorcycle will take up a lot less space but not knowing what I will need or reuse I will still need a plan on storage and separation of all the components, brackets and wiring. And once the bike comes apart it needs to be where it can be worked on for possibly a long period of time. And be out of the way from potentially impacting all of the other minor projects that will arise over the next year or so. So planning ahead on location and location prep is important to insure a smooth project and minimize ancillary impact as the project progresses.

So my first action is to clean up my shop, find a lot of plastic bends and make sure my label marker has tape. Also make a list of the new tools needed for this project which always must be done before you start any new project. 

Project prep begins tomorrow.

1) the Motorcycle:

I want to build a Motorcycle;

Been retired from a job I loved about 20 months after a 32 year career. What I loved about the job was it allowed me to solve problems. Problems that had impact on the facility I worked at, problems that would effect the community I lived in and problems that impacted the people I worked with. I guess I enjoyed the challenge and that people trusted me to find solutions. Retired I initially focused on my health, my home and my family. My son played high school baseball and I watching him play and as retired I did not miss a game. Now heath is good (still need to work on a healthier diet), home repairs have slowed, and there will not be any college baseball (however I'm still hopeful). So I needed something I could focus on.  I have had a motorcycle since I was 15 years old. First was a Honda 90 which I road to high school and my various jobs. Next when I went to college I bought a used Honda CB 350 with a fairing and hard bags.  After college and into my dream job I bought a new Kawasaki KZ 1000 which I fully dressed with, at the time the only real option, a complete Vetter package, fairing, bags, and trunk. I put over 75,000 miles on the KZ until I ran into a wall in Yosemite. The KZ got me hooked on sport touring, it took me to the Canadian Rockies, Montana and other great trips. So my next bike had to fill that void, be reliable, and fun to ride. In 1985 I bought my new BMW K100rt. I loved this bike. It was everything I needed and I put over 90,000 miles on it. Just before I retired  I bought a 2005 Ducati ST3. This is a beautiful and fast motorcycle. The plan was commute to work on the BMW and on weekends quick road trips on the Ducati.

When retirement came earlier than expected the need to commute was gone and I had two motorcycles with different purposes. My spouse and I would use the BMW for trips and I would use the Ducati for quick errands. Those errands had to include hills and back roads because it hated being under 4000 rpms.

Again 20 months into retirement I needed a project and I decided to build a motorcycle. The 1985 BMW K100 is a great bike but the idea of stripping it down to become a cruiser or Bobber I just couldn't do it. But to buy another bike, bring my collection to three, was not going to happen.  So I gave the BMW to my brother, problem solved. Now I needed another bike.

I wanted a bike big enough to tour, fun to ride and that is or could be good looking. I like the looks of the Harley Davidsons but there are so many and all my friends have them. The Goldwings are the ultimate in touring but so big and again it seems everyone has one.  So I was thinking maybe I could blend and come up with something I could build myself and meet all my needs. The Honda Valkyrie could meet that need but if I just wanted to buy a bike what kind of project would this be.

So I started my look for an older Goldwing.  I initially found some on Craigslist in my area. There were two 1987 GL1000 for $600. But they were a mess, stored outside, no title and would not turnover. I offered $300 for both thinking I could build one from them, but no deal so I left. As I researched Goldwings I decided I would focus on six cylinders like the GL1500 and GL1800.  Well the 1800s were all more than $9000 and all too nice to cut-up.  Looking at local GL1500s I found one with 100,000 miles, that ran, and had a clear title. It has problems and needs a lot of work to even make roadable, but that means I could feel free to cut it up. Also most of the Goldwing tech and plastic (fairing, bags, and trunk) can be sold on E-Bay. I made a low ball offer and got it.

 I ordered a shop manual, registered it as non-op with the DMV and my project begins!!!